We’re excited to announce that Single Sign-On (SSO) is now available in CleanRead. Company administrators can connect CleanRead to their organization’s identity provider so team members sign in with the same work account they already use everywhere else — no separate CleanRead password to create, remember, or reset.
Why SSO?
- One identity, everywhere. Your team signs in with their existing corporate credentials.
- Centralized control. Onboarding and offboarding happen in your identity provider. When IT disables an account, access to CleanRead follows.
- Stronger security. Inherit your organization’s MFA, conditional access, and password policies automatically.
- Less friction. Fewer passwords means fewer reset requests and a smoother login for everyone.
SSO is built on OpenID Connect (OIDC) and works with Microsoft Entra ID (Azure AD) and other standards-compliant identity providers.
Setting it up (about 5 minutes)
Setup is self-service from the CleanRead admin portal. Here’s the full walkthrough.
Step 1 — Sign in as a company administrator
SSO configuration is an administrator-only feature. Sign in to the CleanRead portal using a company admin account, then open Help & Settings → Single Sign-On (SSO) from the left navigation.
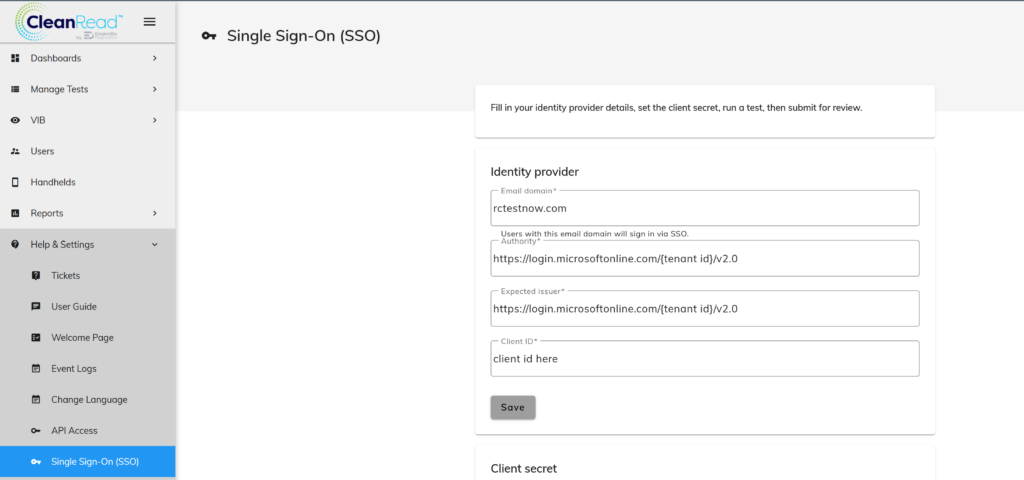
Step 2 — Enter your identity provider details
Fill in the Identity provider card:
| Field | What to enter |
|---|---|
| Email domain | The domain your users sign in with (e.g. yourcompany.com). Anyone with an email on this domain will be routed through SSO. |
| Authority | Your identity provider’s OIDC authority URL. |
| Expected issuer | The issuer value your provider stamps into its tokens. |
| Client ID | The application (client) ID from the app registration you create in your identity provider. |
Using Microsoft Entra ID (Azure AD)? Use this exact format for both the Authority and Expected issuer, replacing {tenantId} with your Entra tenant ID:
https://login.microsoftonline.com/{tenantId}/v2.0Click Save when you’re done.
please note: on Azure AD you need to set the redirect URL to https://api.rctestnow.com/api/auth/sso/callback
Step 3 — Set your client secret
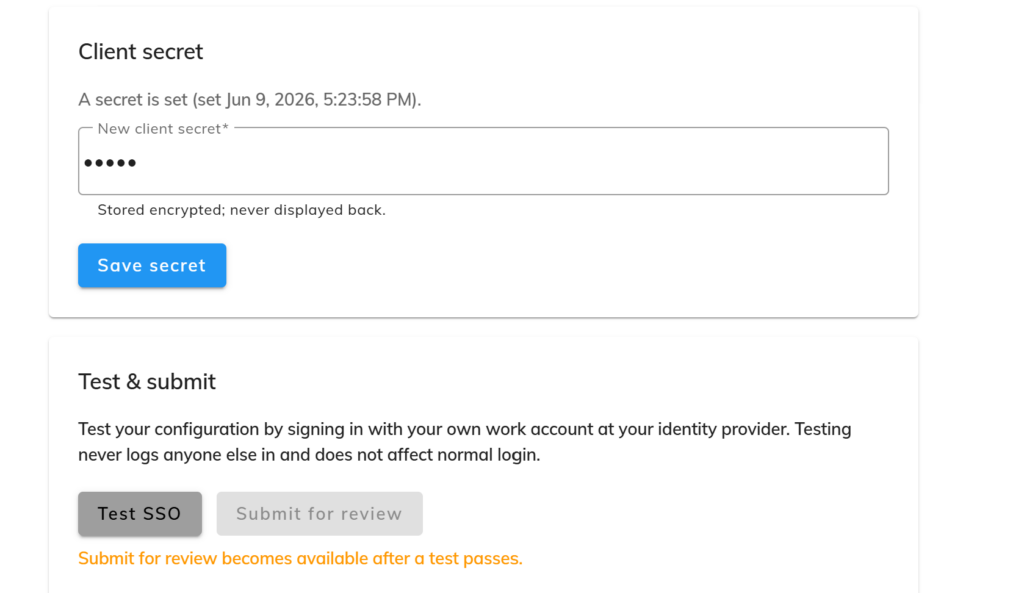
In the Client secret card, paste the client secret generated by your identity provider’s app registration, then click Save secret.
Your secret is stored encrypted and is never displayed back — for security, we only ever show you when it was last set, not the value itself. If you ever need to rotate it, just paste a new one and save again.
Step 4 — Test the configuration
Before going live, run a test. In Test & submit, click Test SSO and sign in with your own work account at your identity provider.
Testing is safe: it never logs anyone else in and does not affect normal login. It simply validates the connection end to end. A passing test confirms all four checks:
- ✅ Identity provider authenticated you
- ✅ Token issuer matches the expected issuer
- ✅ Returned email is on your configured domain
- ✅ Identity maps to a CleanRead user
You’ll see a Test passed confirmation showing the account you signed in with.
Step 5 — Submit for review
The Submit for review button unlocks only after a test passes — this guarantees no configuration goes live until it’s been proven to work. Once your test is green, click Submit for review to send your configuration to the CleanRead team for final activation.
After approval, users on your configured email domain will sign in to CleanRead through your identity provider automatically.
A few good-to-knows
- Only admins can configure SSO. The page is gated to company administrator accounts.
- Testing is isolated. Running a test never changes how anyone else logs in.
- Submission is gated by a passing test, so a broken configuration can never reach your users.
- Secrets stay protected. Client secrets are encrypted at rest and never shown again after saving.
Leave a Reply
You must be logged in to post a comment.